How to Install & Use Vector CANoe on Windows & Mac

How to Install & Use Vector CANoe on Windows & Mac
This blog post is part of the documentation knowledge base for the Elara Aerospace team.
What is Vector CANoe?
Vector CANoe is a high-end simulation, testing, and analysis software for automotive, aerospace and industrial networks such as CAN, LIN, FlexRay, and Ethernet.
Prerequisites
- Administrator rights on your Windows PC
- Valid CANoe license (activation or hardware dongle)
- Recommended: Install CANoe-compatible Vector hardware before beginning installation
Installation Steps
Parallels Desktop Installation
- Download Parallels Desktop from the official website.
- Open the downloaded
.dmgfile and drag the Parallels Desktop icon into your Applications folder. - Launch Parallels Desktop and follow the on-screen instructions to complete installation.
- Use “File > New” to begin setting up a Windows virtual machine. Load your Windows installer (DVD, ISO, or USB), follow the prompts, and let the installer complete.
VirtualBox Installation
- Download VirtualBox from the official VirtualBox website.
- Open the
.dmgfile and double-clickVirtualBox.pkgto start installation. - Go through the installer wizard, authorize the installation with your Mac password, and finish setup.
- Launch VirtualBox from the Applications folder, then click “New” to create a new virtual machine and follow the steps to install Windows.
Installing Your Windows Program
- Once Windows is running in your chosen virtual machine, download and run your Windows program as you would on a real PC.
1. Get the Installer
- Visit the official Vector website, go to the Support & Download Center, and search for “CANoe”.
- Download the latest full installer ZIP package for your CANoe version (e.g. “CANoe 19”).
2. Extract the Installer
- Locate the downloaded ZIP file
- Right-click and select “Extract All…” to unpack the installation files
3. Start the Installer
- Open the extracted folder and double-click
SETUP.exe(orInstall CANoe) - If prompted, run as Administrator
4. Follow On-Screen Instructions
- Keep default options during setup for most users
- Accept the license agreement and advance through each step by clicking “Next”
5. Choose Installation Directory
- By default, CANoe installs in:
1
C:\Program Files (x86)\Vector CANoe
6. Complete Installation
- Click “Install” and wait for the process to finish
- On completion, close any open dialogs to finalize installation
7. Activate License
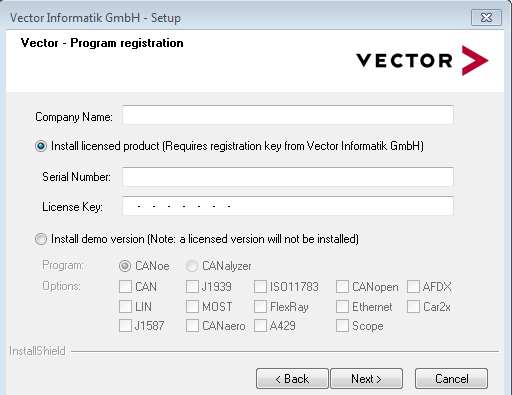 Activate License for Vector CANoe (Screenshot)
- If using software licensing, launch the License Client and enter your Activation ID
- For hardware-based licenses (dongle), plug in the USB dongle before starting CANoe
8. Create Shortcuts (Optional)
- If a desktop shortcut was not created, manually navigate to the installation folder and create one for easy access
Installation Documentation
CANoe InstallationQuickStartGuide by Hasan -
Post-Installation
- Start CANoe and verify connectivity with Vector hardware (if present)
- Configure channels, baud rates, and import database files as needed for your application
- Review sample configurations and manuals for further learning
User Manual
6361d7ba421873e8598b47af by Huy Nguyễn quang
External Resources
- Vector Knowledge Base - Installation of CANoe
- Basic Solutions for CANoe Software Installation Issues
Feedback & Support Author
Suggestions for improvement? Feel free to send Suriyaa your feedback via email.
Donate to both authors with Bitcoin Lightning:
This post is licensed under
full copyright
by the author.